Showing posts with label Create It. Show all posts

Friday, March 27, 2015

Move Over American Girl, Jesus Sees Us Doll Teaches More Important Lessons

Kids love dolls. So, I can't believe it took this long for someone to come up with a doll for Jesus but two mothers of preschool- aged children, have produced the new Jesus Sees Us doll and book for families who want to start or continue the conversation about Jesus and Faith with their little ones.  

With Easter Sunday just a week away, Jesus Sees Us could be a great Easter basket surprise. Just as American Girl dolls set out to teach girls about how girls lived in different periods of history, the Jesus Sees Us doll is a way for children to connect to Jesus in a most engaging and relatable way. The doll serves as a reminder for children that Jesus is always with them, comforting them when they are struggling and celebrating their victories!

I have been searching for tools to assist us in teaching our two youngest children about Jesus on their level.  My youngest certainly does not have the attention span for verbal lessons or books alone and animated and visual options come up short when communicating the true message of Christ’s presence in our lives.

I'm hoping that having the Jesus Sees Us doll around to play with will help them interact with our Savior in a more personal way.
The creators encourage Jesus Sees Us to sit with us at dinner, say evening prayers with us and even be a sleeping companion. Kids can even re-enact the Biblical stories with their Jesus Sees Us doll.  

The doll has a soft body Doll with a hard molded head, a warm and loving face and inviting, open arms. It is accompanied by a hard cover lesson book, appropriate for kids ages 2-6 that includes illustrated Biblical stories of Jesus with Scripture reference and correlating lesson on how we can model our behavior like Jesus today.

Jesus Sees Us Website  www.JesusSeesUs.com
Available through website and Amazon.com with link: www.Jesusseesus.com/buy-now/
$10 OFF COUPON CODE  JSBlog10

Wednesday, December 31, 2014

Purpose and Pause: Planning for a Remarkable Year

Happy New Year! 

I love turning the page on a new year with the promise of new beginnings ahead. It is that time of year to assess where you have been and make adjustments for the year ahead to get where you want to be. It is also the time of year where good intentions are likely to fade within a few weeks. So how can you act now to set yourself up for success?

As the old adage goes, fail to plan and you plan to fail. Setting a little time aside to reflect on your goals and make an action plan to meet them will go along way to increasing your odds for success. Returning to those goals and working your plan consistently is where true success is realized.

I have created the Purpose and Pause 2015 Planner as a tool to do just that. Crafting a remarkable life takes both purpose and pause, my multi-functional planner serves as a tool to visualize your ideal life, set goals to achieve your vision, layout a healthy living strategy, plan for daily work and play, track your progress, and capture your most memorable moments along the way!


I am excited to be testing this planner with a few friends this year and plan to have the 2016 version ready to go to market by end of summer. To help you plan a remarkable 2015, I am sharing with you my goal setting tools for a remarkable 2015! Download your free 4-page goal planner here. I would love your feedback!

Wednesday, November 19, 2014

Is a digital device on your kids gift list? How to handle growing up social.

It's that time of year when our kids are shouting from the other room when the commercials come on "Mom, I want this!"

It is the time we begin to organize our Christmas lists and prep for a big week of sales, Monday before Thanksgiving, Thanksgiving, Black Friday, Small Business Saturday, Cyber Monday and Tech Tuesday! Phew!

I've been putting careful consideration into what I get our kids this year. I am concerned that they don't get enough active play, so I want them to get something that encourages movement. I want to encourage hobbies. I want to get them reading print! (Book/print reading, as opposed to reading on a digital reader promotes focus and creativity, it is calming and relaxing and is linked to increased intelligence and brain activity.) And then there is this issue of technology. 

At our home my husband, teen, and I have smart phones and I have an iPad. Increasingly, my four and six year olds are taking over our devices! Now filled with their apps, my storage is low, the power is always running low and they are sticky (if I can get a hold of one). I believe that technology has a lot of positive benefits. I can see it in my son, who has Down syndrome. He is a visual learner and these apps have helped him learn words and colors. But research shows that too much time can actually be detrimental to brain development. Not to mention other dangers involved with social media I must consider for my teen. 

I recently read this post pointing out that as GenX parents, we are the first to face this parenting dilemma and straddle the divide between traditional media consumers and digital natives. So what are we to do? How do we handle this territory that is relatively untested? How will our decisions impact our kids' futures?

I've considered getting each their own devices this year. Nabi has child friendly tablets with great parental controls such as time limits, Internet blocking, etc. They even have versions for ages 4-6, 6-12 and teens at reasonable prices between $99-$200. But how to make sure I put the right controls in place to reap the benefits and limit the negatives?

Fortunately, I have a guide. Dr Gary Chapman and Arlene Pellicane have written a guide for us called Growing Up Social. In Growing Up Social, Chapman and Pellicane acknowledge that we all want to equip our children to show affection, appreciate others, deal with anger, learn to apologize, and pay attention. Through research and stories, they illustrate how screen time can affect our ability to equip our children in these areas and give us strategies to work around the negative aspects of screen time, such as:

  • Reduced attention span
  • The need for instant gratification
  • Lack of patience
  • Overstimulation
  • Not able to relax
  • Sleep issues
  • Poor concentration
  • Lack of empathy
Growing Up Social addresses how the digital world has affected the A+ skills of affection, appreciation, anger management, apology and attention and provides solutions for ensuring these skills are taught and embraced. The book also addresses the affects of screen time and brain development, shyness, security, parental authority, single parenting and us! The authors point out obstacles and challenges and provide sound advice. The authors are not preachy and fully accept the fact that the digital world is here to stay. They want us to be aware of the affects and consequence and have tools and skills to work around these to provide a right balance for our families.

So, I will likely go ahead and get these devices for our kids fully using the time limit features. I plan to set up a system to earn screen time and to lay a few ground rules:
  • Must read printed words for at least 20 minutes before screen time
  • Must have active play for 40-60 minutes per day
  • No screens while doing homework, unless needed for research
  • No screens during meals
  • Screen time daily limits according to age
  • Devices must be checked in and out by parents in order to use
  • Teen phone must be on charger upstairs by 9 p.m. each night
  • App purchases must be pre-approved
  • Must have all usernames and passwords
  • Teen must review and sign agreement to social conduct/safety standards
  • People first, tech second
In the people first, technology second arena, we will make sure that face time takes precedence in the areas of affection, appreciation, anger management, apology and attention. If you are concerned with how screen time can affect your kids and your family and what you can do to minimize the negative affects, pick up a copy of Growing Up Social, or comment with your family tech tips/guidelines below for a chance to win your own copy!

Disclosure: I was given a copy of the book by the publisher for an honest review.

Monday, November 3, 2014

Homemade Halloween Minions

This Halloween, my gang decided they wanted to be Minions. After a Pinterest search, I came up with a plan to make our own costumes and set out to find the various components: yellow shirts, overalls, yellow hats, black gloves, goggles and a Minion logo. I knew the cheapest place to find the clothing items would be The Goodwill so I searched high and low and fell a little short. I only found overall dresses for me and Annie ($5.60 each).


The next stop was Walmart where i scored two adult yellow shirts ($7 each), black gloves ($1x4), and two pairs of kid size overalls ($8 each). However, I could not find yellow hats or yellow shirts for my little people. My solution was $1 white hats (x4) and two white long sleeve shirts ($4x2) that I would dye yellow.

The dye project was only partly successful. The yellow shirts took perfectly to the RIT dye ($3) and matched the other yellow shirts exactly. However, the white hats did not take at all. Time for plan B. I tried yellow craft paint that I had on hand. The paint covered the hat but did take a while to dry. Because I was running out of time, we decided to try spray paint ($4). I put the hats over cans outside and sprayed them all around. It worked and by Trick or Treat time, they were dry.

Finally, we needed the tell-tale goggles worn by the little Minion creatures. I was fortunate enough to happen upon some clown sets at The Dollar Tree that came with black coke bottle glasses and clown noses ($1x4). We used the glasses and a silver paint pen ($3) to make them look like Minion goggles.

To finish off the outfit, I found a Gru Logo print out online and used double stick tape to adhere them to our overalls. I think we made for a cute bunch of Minions at approximately $52 for four costumes with the shirts, gloves, hats and overalls all able to be worn again.


Wednesday, April 9, 2014

Packing for Travel Fun & Memories

This week, we traveled to the beach for spring break. We have been looking forward to some time away for a while. Our drive is about eight hours (with stops). I tried a few new things to make the trip go by easier with our three children and our big dog. Hopefully, this will give you some helpful ideas to try.


I made sure to pack lots of snacks for the car, both for the kids and for my low carb needs. In an attempt to keep spillage to a minimum, I brought empty Parmesan cheese containers to hold the snack mix. The opening on these containers makes it easier for the kids to shake out a handful of goodies and not spill it on the floor.


I made a quick and easy snack mix of Cheerios, M&Ms and marshmallows. I brought hard boiled eggs, protein bars, sunflower seeds and roasted almonds. 

To keep the kids occupied, I created a travel binder with coloring sheets and games such as the license plate game, the ABC game and a funny face magnet game. This is our first trip in our new car; it doesn't have a TV like we did in our van. Surprisingly, the kids did quite well without it. However, my oldest did have her iPhone.

I also made a new playlist that included songs from Frozen and Teen Beach Movie.

To keep the whining to a minimum, I used a reward system. I made three circles with each of the kids' faces on them and clipped them to the visor. If there was fighting, whining, talking back or disobedience; the offending person's circle came down. When we made a pit stop, the kids who had their circles clipped to the visor either got a treat or to pick the next music cd/playlist/Sirrus channel. Whomever had their circle off the visor, was assigned car clean up duty. Acts of kindness could earn your circle back up. The system worked fairly well and was a good incentive.


I also tried a new packing trick. We have a deep, but narrow, trunk space. I packed our clothes in these rectangular plastic tubs, which are easily stackable. This allowed us to stack things seat height and was easy for the foldable wagon to fit on top. 


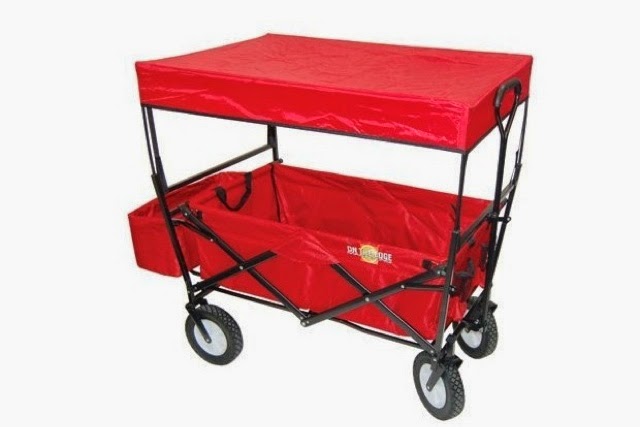
Speaking of the wagon, I got it off Amazon figuring it was a good way to haul beach gear and stuff needed for a day at the horse track (plus I can haul my scrapbook gear to crops in it later). It will hold both kids and a small cooler and provides a sun shelter when needed. 


I also got a collapsible cooler basket for the car, beach and racetrack. I thought it would also be great for the pool. However, after two uses one if the rivets came off so I am not sure it is going to last the summer. 


With that, we were all set for a week at the beach. 


What is on your Spring Break packing list?

Wednesday, March 26, 2014

Behind the Scenes Tour of Hobby Lobby

Earlier this year, I had the opportunity to tour the amazing headquarters of Hobby Lobby in Oklahoma City. It was a really neat experience.  Today, I am sharing some of that behind-the-scenes tour.


The headquarters complex is massive. I toured the corporate offices and main warehouse. One things that is really neat is they have a full size store inside the warehouse completely set up with merchandise just as it is in the store. They test placement , displays, etc. to try to create the best I store experience.


Hobby Lobby also designs and manufactures much of its own merchandise, eliminating the middle man which results in lower prices and a lower bottom line for the business. I got to see the process from a design idea to the resulting products. For example one design pattern could end up as a sheet of card stock, a reem of fabric, a element if jewelry, a piece of print art, and so forth.

Next, crafters and designers take those unique products and create cool projects for the Hobby Lobby website and idea magazines, etc. I have to admit I was a little jealous of the people whose job it is to come up with fun craft projects all day!


My favorite spot was the scrapbook merchandising room. Each store has managers for the different speciality areas such as sewing, framing, holiday decor and scrapbooking. Tip: If you don't see something you want on the shelf, be sure to ask for the store's section manager - such as the scrapbook manager- and they can communicate to corporate what the consumer product demand is.


While on my tour, I spotted a few things I would like to create. Here is a welcome sign made out of Scrapbooking supplies. It's another way to use up my stash of product! I really like the layers of patterned and textured paper , fun stamps and the dimensional floral elements. I would put this in a beautiful frame and put it in my front entry. I'm thinking of doing different versions with patterns that match the season.


I hope you enjoyed my mini tour behind the scenes of one of my favorite craft stores! 


If you want more creative inspiration jump on over to www.mommyiscoocoo.com where I am so excited to be co-hosting the Come Grow Your Circles Google+ party today. If you are a creative blogger looking to grow your circles -  join us at  on Wed. and link up your g+ profile.
Are you looking to grow your circles on Google+?  Do you want better SEO and increased website exposure? This is the place to be!  Welcome to the http://www.mommyiscoocoo.com/" mommy is coocoo circles hop.

*Update we've created a facebook group for Creative bloggers who google+.  Message  https://www.facebook.com/mommyiscoocoo" target="_blank">here
 with your email address if you would like to be in to the group.

If you want to get coocoo with us on Google+:

1. Add all of the cohost to one of your circles.

2. Link up your Google+ url NOT your blog url.

3. Share a creative post (i.e. posts about cooking, DIY, crafts, etc...) to the public on Google+ and include the hashtag #mommyiscoocoo.

4. Socialize - The more shares a website or blog post has the better chance it has of ranking well.

  • Add new friends to your circles.

  • Comment and Share posts you really enjoy!

  • Throughout the day +1 posts with the hashtag #mommyiscoocoo on Google+
  • *If you want to grow your presence on Google+ email Amanda at mommyiscoocoo(at)gmail(dot)com to cohost.
       

    Monday, March 17, 2014

    In Case of Emergency: Five Tools to Help Your Prepare

    As parents, we don't like to think about the emergencies that might pop up. However, if we take some time to think through potential situations and make some basic advance preparations, we will be better positioned to handle these situations when they happen. 

    Like last month when we were on our way home from my sons weekly tutoring session. My daughter, who plays while her brother has his session, had gotten a goodie bag filled with chocolates and candy hearts that was left over from a party at the center. During the ride home, Carlie sweetly shared a candy conversation heart from her little goodie bag with her three year old brother who was sitting in the car seat beside her. 

    As we were pulling into the neighborhood, Carlie exclaimed, "Mommy, Joey is choking!"
    I looked in the rearview mirror to see Joey coughing and gagging. I pulled into the drive, quickly parked the car, and got him out of his car seat. He was breathing, gagging and spitting up a bit. He was clearly uncomfortable and trying to cough the candy up. I attempted to do the Heimlich and called 911. With the sense that everything was going to be okay, but worried nonetheless, I tried to comfort my little guy while we anxiously waited for the paramedics. 

    It did not take long for a fire truck and EMS vehicle to pull into the drive. Several guys jumped out and came to the door. As the paramedics asked me questions and assessed my son, the candy finally dislodged and went down. Joey quickly calmed down and was excited to see the fire truck parked in front of our house. He was very interested in the firemen and paramedics, who were very sweet. By this time, my parents and husband had arrived on the scene. We decided he was ok and turned down the trip to the ER. What a relief.

    This incident was a reminder of how quickly an emergency can pop up. I was thankful my daughter knew the signs of choking and could alert me. Basic CPR/First aid training helped me to remain calm. Being prepared really does help. 

    Today, I'm going to share five tools to help you in case of emergency. 


    1. Smart 9/11

    Smart911 is a free service that allows citizens across the U.S. to create a Safety Profile for their household that includes any information they want 9-1-1 to have in the event of an emergency. Then, when anyone in that household dials 9-1-1 from a phone associated with their Safety Profile, their profile is immediately displayed to the 9-1-1 call taker providing additional information that can be used to facilitate the proper response to the proper location. At a time when seconds count, being able to provide 9-1-1 with all details that could impact response the second an emergency call is placed could be the difference between life and death. You can sign up at Smart911.com. It takes about ten minutes.

    Smart911 is also very helpful to families who have a member with a developmental disability. 

    9-1-1 telecommunicators play a key role in figuring out the type of emergency that is occurring and determining the proper staff and equipment needed in the particular situation. Smart911 can let 9-1-1 operators know that there is a person with a disability at your home, communicate the specific details about the person's condition and needs, and ascertain if the response may require very specific actions. 

    If a person with a developmental disability dials 9-1-1, but is not able to speak with the call taker, that can be noted in their profile. Call takers will see each person's specific medical notes and can dispatch teams appropriately based on their needs.
    If a person with a developmental disability dials 9-1-1 for assistance, but does not have the ability to clearly relay specific information to 9-1-1 — such as their name, address or details of their emergency — that information can all be stored within their profile. Additionally, an emergency contact can be listed for this person as well.

    2. Guardian

    The Guardian, the world’s first cloud computing safety network for children, is a tracking device for your child that can be clipped on his or her clothes or hung on a necklace. As long as your child is wearing the device, you can see their exact whereabouts on your smart phone through the corresponding app. 


    All parents know what it’s like taking children to parks, malls and amusement parks. With all the people around, sometimes it’s quite nerve-racking trying to keep an eye on your children while they’re running about. For those of us who have a "runner," this device can be life saving. 
    The app alerts you if your child wanders out of the perimeter you set. Parents can also add trusted ones, such as neighbors, teachers, nannies and relatives, to their group as co-guardians, so that more people can help keep an eye on the little ones.
    The more people who install the app, the more watertight the network becomes. Here's why: If a child is found missing, parents can immediately launch a global search. When the child in question passes by a person using Guardian app, the cloud system immediately sends the location to the parents. When the lost child passes by a user of the Guardian app, only the parents of the lost child and anyone else the parents chose to include as co-guardians are notified. The user does not know about it. I'm really excited about this tool for keeping track of my son in public places as he has a way of squirming away from us!
    3. Evernote

    My third tool is also an app. Evernote is a notebook app for your computer and mobile devices. The apps syncs between devices so all your information travels with you. In my Evernote, I have created a family health notebook where I keep track of what medications each person is on or has been on and other details I need to know when going to doctor's offices or in an emergency.

    4. Family Emergency Notebook

    Next, I have an actual emergency notebook in our house that has profiles on each family member, including a recent picture, finger prints, health information, important papers, etc. Should we have to evacuate in a hurry, I can grab this notebook and have all of our important information with us.

    The notebook includes:
    • Personal ID sheets for each person and pet in the house
    • Birth certificates
    • Immunization records  
    • Passports
    • Social security cards
    • Allergies or health information
    • Important information overview sheet, including:
      • Our address and phone numbers
      • Essential info for every member of our family (name, DOB, allergies)
      • Phone numbers to all our insurance companies along with the insurance policy numbers (car, life, health etc)
      • Other important emergency numbers (poison control, 24 hr nurse line, gas company, plumber, etc)
      • Our doctor’s phone numbers.
      • My husband’s family’s numbers (parents, siblings, grandparents)
      • My family’s numbers
      • Local friend’s numbers
      • Non-local friend’s numbers
      • Other important numbers
    • A written copy of all our log-in information for our various online accounts including banks, insurance, cell phone, school loans, Facebook, email etc.  
    • Property titles (homes, autos, boats etc)
    • Insurance policies
    • Copy of car registration
    • Will
    • Medical directive
    • Marriage License
    • Written Home inventory (and a DVD of a video inventory)
    • Map of the area, with meeting locations marked
    5. Emergency Car Kit

    Finally, an emergency kit in your car is a helpful tool in case of bad weather or a break down. Here is a post I wrote about car kit essentials.

    I hope these ideas help you in case of emergency! Please share your tips below in comments. I'd love to hear how you prepare for emergencies.

    Wednesday, March 5, 2014

    St. Patricks Day DIY Decor and more!

    Today is a full day for my blog! First, it is spread the word to end the word day. Second, today kicks off the Shazzy Fitness 7 day fitness challenge. And third, I have a new St. Patrick's day craft to share and I'm co-hosting a Google+ Craft Blog Link Up.

    Let's get started!
    I am hoping you'll join me in pledging #respect for persons with intellectual disabilities and refrain from using the "R" word anymore. See my post on this explaining why even casually using the words retard or retarded is hurtful and offensive.


    This morning, I kicked off the seven day fitness challenge: Move, Groove, Amen with a ten minute dance video from Shazzy Fitness DVD In The Beginning. My friend Kristy has launched this great fitness company with inspiring dance fitness videos you'll want to try out! I'll be giving away a DVD later this week so stay tuned!


    And now to crafting! 


    This week I was in the mood for St. Patricks day and thought I'd make some decor for my house. I went to Michaels and got the supplies: A wood plaque, green paint, sparkly white letters and some sparkly green card stock. I added to that my trimmer, scissors and Modge Podge. 


    First, I painted the wood this festive green color with two coats, letting it dry in between.


    Next I put my green paper on the wood plaque and traced a section where the curves are, Cut the paper to fit, and then adhered it to the wood with a layer of Modge Podge under and over the paper. The Modge Podge over the entire sign made the paint have a nice sheen to it.


    Last, I adhered the glittery letters to the sign as well as some homemade shamrocks I made out of the remnant glittery green paper. I'm still considering adding some ribbon on the top and bottom of the paper seem. What do you think?


    If you want more creative inspiration jump on over to www.mommyiscoocoo.com where I am so excited to be co-hosting the Come Grow Your Circles Google+ party today. If you are a creative blogger looking to grow your circles -  join us at  on Wed. and link up your g+ profile. 

    Are you looking to grow your circles on Google+?  Do you want better SEO and increased website exposure? This is the place to be!  Welcome to the http://www.mommyiscoocoo.com/" mommy is coocoo
     circles hop.

    *Update we've created a facebook group for Creative bloggers who google+.  Message  https://www.facebook.com/mommyiscoocoo" target="_blank">here
     with your email address if you would like to be in to the group.

    If you want to get coocoo with us on Google+:


    Please add our button to your sidebar or post!


    1. Add all of the cohost to one of your circles.

    2. Link up your Google+ url NOT your blog url.

    3. Share a creative post (i.e. posts about cooking, DIY, crafts, etc...) to the public on Google+ and include the hashtag #mommyiscoocoo.

    4. Socialize - The more shares a website or blog post has the better chance it has of ranking well.


    • Add new friends to your circles.

    • Comment and Share posts you really enjoy!

    • Throughout the day +1 posts with the hashtag #mommyiscoocoo on Google+
    • *If you want to grow your presence on Google+ email Amanda at mommyiscoocoo(at)gmail(dot)com to cohost.


      Tuesday, February 25, 2014

      Working Mom's Home School Classroom

      It's transformation Tuesday! This week I'm showing how we turned a toy catcher into an education station or home classroom. 

      I am a full time working mom. I admire the classroom spaces my home school mom friends have set up. While I can't make the decision to stay home and teach my children full time (and I don't think I'm wired for it), I still cannot leave their education solely up to the school or even the church. Having a spot that has all of my tools close by and organized, helps me fit teaching time into our weekly routine and it helps me stay on top of what they are learning at school.


      We have had this IKEA shelf for a few years now and it has lived behind our couch in our living room and most recently under these photo shelves in our dining area. Typically, these baskets have stored lots of toys. We have had baskets filled with balls, cars, stacking toys, coloring books, puppets and more. 

      Lately, we've been trying to clear out clutter and we have tried to declare the family room a toy free zone. We also have had a problem with homework time and a place to put the backpacks and other school supplies. So, I cleared out the toys and gathered all my educational supplies and got to work. 

      The shelf unit is right in our dining area so the kids can do their homework right at the table while dinner is being prepared. 

      • Three empty baskets store each child's back pack. 
      • One basket holds coloring books and paper. 
      • Another basket holds basic school/homework supplies such as a pencil sharpener, pencils, erasers, notecards, hole punch and stapler. 
      • A literacy box holds letters, letter and word flash cards and other literacy tools. 
      • The math box holds items such as geometric shape manipulatives, addition, subtraction and multiplication cars, money manipulatives and flash cards and time clocks. 
      • Our religion box holds notebooks from Sunday school, family devotion books and a study bible. 
      • Finally, our therapy box holds fine motor skill and occupational therapy tools.
      Now, what's left is being disciplined enough to go beyond the nightly school homework and actually use these tools regularly. 

      On Saturdays we go to tutoring and a literacy class for my little guy. Each week we get homework of flash cards with pictures and words and activities that go along with the letter of the week. These activities are also good for my kindergartener as she is learning sight words. Carlie likes to play school and do the flash cards with her little brother. I try to fit at least 10-15 minutes of this work on the week nights. 

      I plan on incorporating some math, literacy and Bible study into the daily routine this summer as well. 

      Do you have a home classroom or study/homework area? I'd love to know how you set it up and are using it within your weekly routine.


      Wednesday, February 19, 2014

      Pantry DIY Part Two

      Last week I shared how we turned a gaping hole where a double oven used to be into a new pantry.


      This week I'll share what we did with the old pantry to address a traffic flow issue in our kitchen. Below if the before picture. This was our primary pantry and it sits, next to the refrigerator, in the walkway from the Kitchen to our eating area. This is an area of high traffic and the opening of the pantry doors and fridge doors is inconvenient When we moved in there were no shelves in the pantry so we hasitly cut wood shelves and had not gotten around to painting them. 


      The Solution: 


      We moved most of the food into our new pantry which sits next to our stove. This old pantry got a fresh coat of paint and now is the home to our baking products, supplies (such as mixers, baking sheets, etc.) and appliances that are not used frequently. This has reduced the daily in and out of the pantry which helps with traffic flow. 

      Don't you just feel good when you reorganize?

      In the plan for our future kitchen renovation, I hope to move both pantries to a different area of the kitchen, which now holds one of those built in desks and is a clutter catcher. I want to built a large, pantry there with all kitchen essentials inside and completely reconfigure the flow of the kitchen. But for now, this solution has been really helpful.


      a mom blog community!

      Tuesday, February 11, 2014

      Transformation Tuesday: From Double Oven to Pantry

      It's Transformation Tuesday and this week I have a home renovation project to show.

      When we moved in we had a nice looking double oven and brand new stovetop. However, the ovens did not work and could not be fixed economically. Additionally, the oven was not a standard size so a replacement would be very costly. 

      So, we decided to take out the stove top, cut the Corian and install a brand new range. That left us with less cabinet space and a cabinet with a gaping hole. 


      Well, one year later we have finally filled up that hole and we have a second pantry! It really wasn't that complicated and should have been done a long time ago but let's just say we don't get projects done quickly around here. Plus the kids thought it was a great house. 

      How We Did It

      We sanded, primed and painted the inside. 


      My folks found a door discarded for another home renovation. It was almost the perfect size. Just a little trimming needed.

      Then we purchase wire brackets and shelving from Home Depot. We used a zaw saw to cut the long shelf piece into 24 inch wide shelves. 


      The Result

      This pantry solves a traffic issue in our poorly designed kitchen. The refrigerator and old pantry are in the only walkway though the kitchen to the dining room. With both of these opening several times a day, it is a constant obstacle course. 


      The new pantry will be our primary food pantry. A spot for lunch supplies, snacks, canned goods, beans, pasta, spices, breakfast foods. On the bottom, I need to find stacking bins for onions, garlic, potatoes. 


      The old pantry will be a spot for baking supplies: flour, sugars, cake decorating, baking sheets, and appliances that are used infrequently.  We are currently painting the shelves and insides of this pantry so I'll show that set up next week.

      Pots and pans, Corning ware, Pyrex dishes and bowls and other appliances will be in a nearby cabinet underneath the counters. Storage containers will be in a cabinet near the fridge. 

      I am going to label it all using chalkboard contact paper punched in a label design and chalk markers. I'm considering painting the inset of the door with magnetic chalkboard paint but I'm afraid it would end up looking cluttered. 


      What do you think? 

      I have big plans for a total kitchen redo in the next two years. New flooring, cabinets, counters. The works. In that renovation, I am thinking of building a larger pantry in another area of the kitchen. But for now, this new pantry addition will help cut down on the traffic in the main walkway and give us more overall storage. 

      Tuesday, January 14, 2014

      Transformation Tuesday: Simplifying Holiday Decorating

      I love all the ideas for holiday themed home decor I find on Pinterest and in the home decorating magazines. Let's just say I have home envy. I am blessed with a nice house in a wonderful neighborhood and I don't take that for granted. And we are slowly renovating said nice, but 40-year old house, so it is not always so perfectly presentable. In addition, I think my tastes have grown up (again, thanks to Pinterest) and I'm ready to release some of my older stuff for a new look. But, alas, my budget and time is limited. So my new philosophy for home holiday decorating is: Keep It Simple Silly!


      When we moved, we also lost a lot of storage space. As a result, I have a keen interest in decorative products that have multiple purposes. In addition to a lack of space, with three kids, working full time and numerous activities, I also don't have time or brain bandwidth to be switching out tons of decorations each season. However, I love marking the little celebrations of life and making small changes that make life more festive.

      My new inspiration is to find everyday items that can be altered in a small way to celebrate each season and reserve the big changes for Christmas.

      For instance, my front entry buffet is a welcoming spot to my home. I would like this to reflect the time of year. I do this by adding a seasonal piece of framed artwork to the display and changing out the floral arrangements such as the Spring Subway Art Canvas pictured below. Sometimes I add seasonal trinkets as well. Im planning to put out cute miniature pink and blue mail boxes for Valentines.


      On the sidebar in my kitchen, I have glass jars in which I switch out the "fillings" to reflect the season. I found red glittery star ornaments over Christmas and thought they would do double duty for July Fourth. During fall and winter, I fill with pine cones and add small gourds for autumn and red glass balls for Christmas. For St. Patrick's Day and Spring, I added these green ceramics and enticing green candy.


      I've seen a number of great ideas for how to fill these jars for each holiday.


      These plate holders in my kitchen can also be switched out with seasonal plates and signs. Right now, they hold artwork my kids created over the winter break. Note: The Sharpie on plate from the Dollar Store Pinterest trick does not work. We heated the finished project in the oven as directed but the ink washed off anyway. I managed to save a few for decoration anyway.

      This adorable memo board can be switched out to highlight seasonal photos and drawings by my kids.


      And  I switch out these 12x12 frames with scrapbook pages that mark the season or the birthday child of the month or whatever I want to highlight.


      I also found these metal heart ornaments that can be hung up from Christmas through valentines and even reappear around patriotic holidays paired with white and blue items.

      This adorable tree is a great place to hang seasonal decorations. I found these black frame ornaments during Christmas and plan to leave them hanging all year (need to actually put photos in next). I'd like to make some seasonal ornaments with the kids to add on. During advent, this becomes our Jesse tree. It looks like the kids found some beads and have already decorated for Mardi Gras.


      Hand towels, place mats and salt and pepper shakers are another easy thing to switch out by season. 

      Now, the front door and front porch is an area I'd like to focus on this year. There are so many creative holiday wreath ideas out there. I also love the idea of switching out a front porch sign or flag by season. Another idea is to use natural items such as pumpkins in October/November and the spray paint them white and stack them and turn them into a snowman for Dec./Jan. then toss! Brilliant. 

      I'd love to hear your ideas for simple, interchangeable holiday decorations. Please share a tip in the comments below.